Showing posts with label Decor. Show all posts

Wednesday, January 14, 2015

The After Christmas- Christmas

Well, I would first like to say thank you for all the kind words from Monday's post. It felt good to get it off my chest and every comment meant the world to me. To us. I still haven't told family and many friends, so your words of encouragement are all we have, so again, thank you.
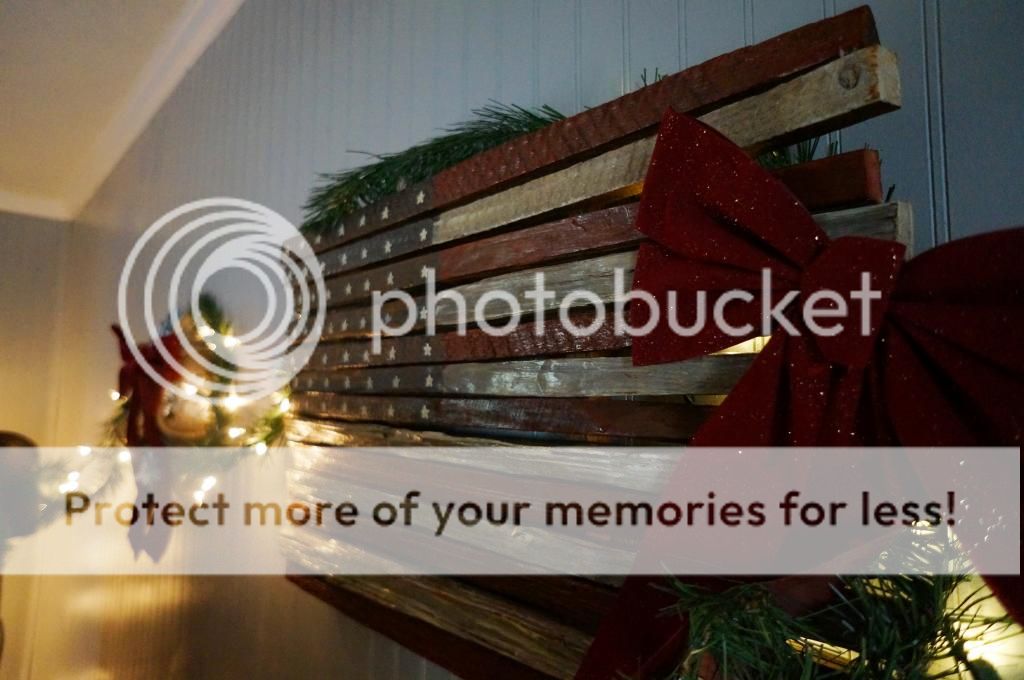

This will be the only Christmas we have in this house. I'm surprised I even realized that, but it made me happy that we made the most of it. I put up more decorations than I ever have, we had our first real tree, and we had our own belated Christmas morning, which was filled with just as much excitement. After all, Christmas is a feeling, not a day.




We had already exchanged gifts, but we both saved a few good ones for this occasion.  A little back story is that when the guys make it through Flight school they give their spouses their own 'set of wings' to thank them for putting up with them all the help and support. I don't particularly like chain necklaces, so he got me wings that are more my style from Nomades. It's a little early to get my wings, but I'll take it ;)

PS. This is not an ad. I just really love the company! MilSpouses definitely need to check them out. They have all kinds of military charms and are just like Pandora! I even switched some of my Pandora charms to this bracelet because I like it better.


When Will saw that I put multi-colored lights on the tree he thought I was crazy. He knows I'm not a multi-colored girl, but something came over me. For our first real tree I wanted to go super nostalgic, and although I'll probably never use multi-colored again, it was fun while it lasted. Technically it lasted until today because I'm still getting decorations down, but don't judge me. I'd leave them up all year if I could. One day...I will be that old women with a Christmas house year around. Then you have permission to judge me.


Wednesday, May 21, 2014

My Latest Masterpiece: Dresser Repurpose

If you don't care about this tutorial, just scroll on down to see the finished product and tell me it's pretty. I spent a whole week on this thing, so I want confirmation that it was worth my time. Not that I don't get giddy every time I look at it, but you know what I'm sayin'.
Perhaps you remember this old dresser...


We actually bought that dresser for half off at Salvation Army, and it was meant to be a stand in until we decided on an entertainment console. Fast forward three years later, and we still haven't decided on new furniture. Well, I got tired of looking at it, so now that I have the 'spare time' to take on new projects it was time to revamp the eyesore.

The problem, was that this isn't even a real wood dresser, as in it's basically a step above Ikea. I knew there had to be a way to paint this god-awful mixture of laminate and particle board, so off to Pinterest I went. Yep, that means that I'm actually using the pins on my boards and not just pretending anymore! Really all you need to know, is that Primer is your friend, and it will allow you to paint anything your little heart desires. A lot of paint is made with Primer nowadays, but when we are talking about laminate and un-sanded surfaces, the real stuff is the way to go. Save yourself the freakout later when your paint starts bubbling up.


PRIMER || PAINT IN IVORY LACE || PROTECTIVE FINISH
**I also recommend going with water based products, because if you've ever tried to clean your brushes and pans, oil-based is a biatch to deal with. Along with those supplies, don't forget to pick up a little Paintbrush & Roller Kit. Mainly, you need a paint tray and a decent brush, but having a couple different sizes of foam rollers won't hurt either.**

Step #1
After you've laid down cardboard or tarp, remove the drawers/ hardware, clean all the surfaces, and get to priming. 


Oh hey, look...it's dark outside.
Time to pack it up and let it dry over night. Don't get scared, it only took less than an hour.


Step #2
Day two and three are for laying the color with drying time in between, and that's when you really feel like you are making the magic happen. If you are feeling froggy, you can even take a piece of sandpaper to the edges to distress them before putting on your Polycrilic. Just don't get too froggy or you will have to paint over your mistakes. Sidenote: You can also use the sand paper to get rid of any drips or mistakes along the way.


Step #3
Protect all your hard work with the Polycrilic finish. You have to be really careful with the water based version of this {and you may even want to try oil based}, but if you take your time, it turns out beautifully. It adds to the finish without discoloration or the heavy lacquered look.

Step #4
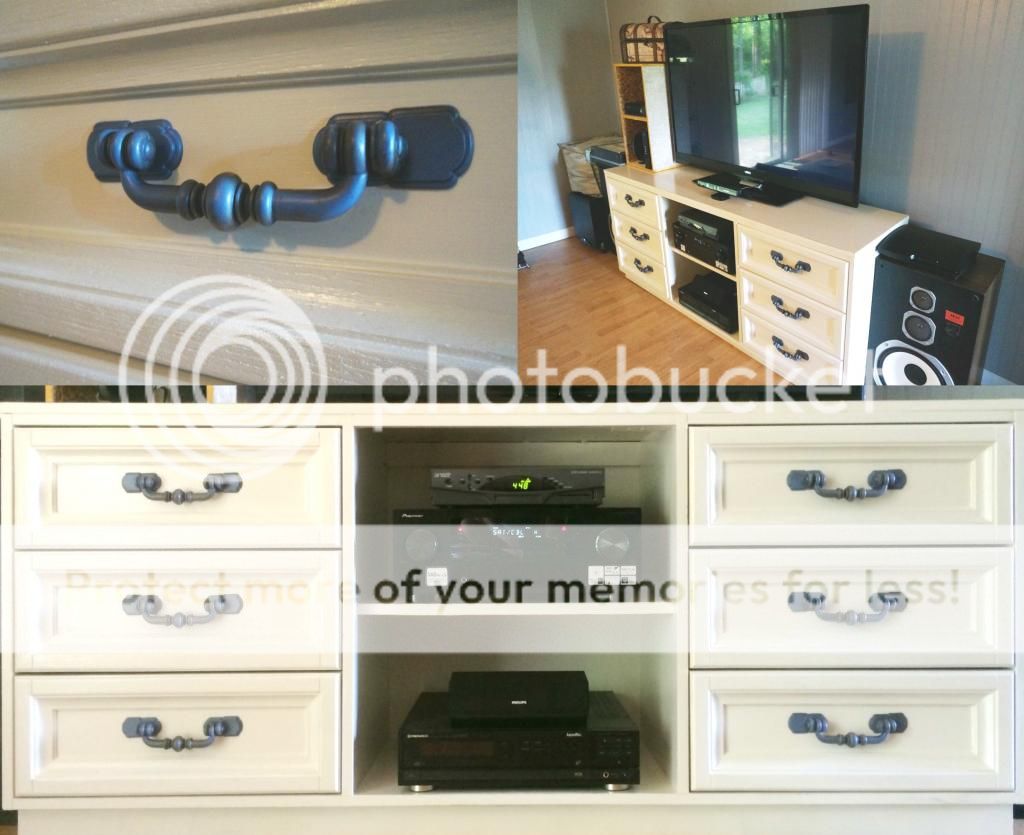
Decide what to do about the hardware, because the drawer pulls are the key to creating a full update. Surprisingly, this was the hardest part. The extra ones I had were the wrong size, I went to Lowe's and their selection was meh, and I searched Etsy but the prices were ridic, so finally, I realized I'd just have to make do with the originals. I decided that a little  Periwinkle Spray Paint would do the trick, especially since I already had another 'piece of crap art' that I desired to have Periwinkle. Inspired by this pin.


Gotta love killing two birds with one stone can of paint. So now we have some wall art, and I get giddy everytime I watch tv with my new entertainment center.


Whoops, I'm getting ahead of myself.
Step #...I forget, is putting the whole shebang back together.


And BAM...it's like a whole new dresser! Or shall I say Console?...Yeah, that sounds fancier.

I wanna pat myself on the shoulder, and say 'Git down wit yo bad self!'
Now, ask me about the Floor lamp I made. I'd love to tell ya about that one too ;).

Last but not least, I'm happy to announce that Jamie from Handling With Grace won The Coffee Doge giveaway, so let's give her a hand! This lil momma of two and fellow military spouse deserves a sweet treat, but thanks to everyone that participated!


Thursday, December 13, 2012

It's Beginning To Look A Lot Like Christmas

Guess what, guess what?
Will and I got to do a couples shoot yesterday, so we are going to have great pictures for next year's Christmas cards! I wasn't able to make new ones for this year, since someone has kept me quite busy since he's been home, but we are now ahead of the game for next year! Don't worry, I won't be able to keep them under wraps until next year, so I will share them in the near future.
Photobucket
It wouldn't be the holidays, if we weren't pinning all of the fabulous Christmas inspiration.
Am I right or am I right?

Whether funny or helpful, I love all of the seasonal inspiration.


I need to borrow someone's three year old to try that one...In fact, I think one of you should try this and video tape it! It would totally go viral. Raven, I volunteer YOU!

As for decor, I take things a little more serious.

Source: google.com via Janna on Pinterest

Perhaps you are noticing that I don't go for the traditional Holiday decor.
I still think they are nice, but when I decorate I like to go for lighter subdued colors, and I am also attracted to new ideas. Like so:


How do you decorate?


DecemberGiveaway

Tuesday, July 24, 2012

Letting Go...


Raise of hands...Who else is as RIDICULOUSLY excited as I am that Meg's preggers?!
I have stalked been enamored with Meg and her hubby for quite some time, and I love that I get to be excited right along with them! Can you just imagine them as parents? Gets me all giddy!

Sometimes: People think it's weird to "meet" people online.
Always: Chat rooms, yes. Blogging, totally normal.

Photobucket

Sometimes: We ogle over everything at C&B, Anthro, and Pier 1.
Always: If you put the effort in, you can make/thrift decor that is just as cute!
You know how they say:
 "It's not the clothes that make the girl, it's the girl that makes the clothes..."?
I say, It's not the decor that makes the decorator, it's the decorator that makes the decor!

Sometimes: We get wrapped in all the commercialization.
Always: I'll keep my money in the bank, and have more fun thrifting!

Sometimes: We get wrapped up in material things period.
Always: It's OK to take a picture and let go...
These are small treasures, but it's time to de-clutter.

Photobucket

Sometimes: People cherish every artifact filled with memory.
Always: That's why there's a show called Hoarders.

We might move every three to five years for the next twenty years, so I'm definitely wanting to downsize. We filled the BIGGEST truck they had last move, and we have even more furniture now. 
How do two twenty-somethings acquire this much? 
No clue, but you better bet I'm going to get us in check by the next move.
If it's not nailed down, it's available!

Photobucket

Snag them for yourselves or Christmas is coming...
Send your boyfriends and husbands my way!
Otherwise, these babies are going on ebay for a few other lucky ladies Christmas presents.
Hillary, aren't you the ebay queen? Haha.
~~~~~~~~~~~~~~~~~~~~~~~~~~~~~~~~~~~~~~~~~~~~~~~~
You all know that tomorrow is the next installment of GBB, right?
I hope everyone has their videos ready.
I love Vlog days, so come back tomorrow!


Sunday, July 22, 2012

From Clearance to Classy!

Today, I get to reveal what I have been working on, and finally finished this weekend!
And yes, Sami, this is my weekend update ;)
Photobucket
I think it turned out pretty cute!

I had initially bought the unit to go in the kitchen, but realized that it was too big for what I needed. It had been a clearance item ($9.99 woohoo!), so I held on to it. Part two of the story is that Will gets a new tv when he gets home, therefor I sold the old one and that left a hole on our entertainment center. Which leads us to part three: jazzing up the unit.

Photobucket

I wasn't really sure what to do with laminate covered particle board, so the only answer was MOD PODGE and textured scrapbook paper. It's like a DIY'ers form of duct tape.
At least in my house it is.

Photobucket

I didn't want to leave the edges white, so I mixed a light brown oil paint with a grey acrylic paint.
I know that is quite an odd combo, but it gave it the wood texture that I was going for. I ended up having to cover the edges with mod podge to seal the oil in, but it worked!

Photobucket

You may not be able to see, but the texture on the outside looks like leather, and turned out fabulous! As a matter of fact, I think it pulled the whole area together. What do you think?

Photobucket

And when asked if he liked it, Will replied "Where's my TV and Xbox?"
He's very lucky I knew he was kidding.


Photobucket

I was once told that regardless of how many Military moves we make, we should always make each house a home. I have truly taken that to heart, and I am so happy to have a haven for our little family. It's not perfect, the dust still accumulates, and the dishes aren't always done, but it's all held together with love. Can't wait to have you home, lover.


Monday, May 23, 2011

D.I.Y. Signs- So Simple That We Forget...

Or at least I do...I don't know about you, but I'll see cute signs in a store and I'll tell myself, "I can make that myself!"  Why then, do I always forget to make them?  Well, except for this sign right here:


I think was inspired enough to make this one because I had only been married about six months and my new last name excited me...  I'm pretty proud to call him my husband and equally excited to have accepted his last name, albeit I was sad to lose my father's name, as he is my hero <3 It's funny how a name can truly mean so much...After having one last name my whole life- all of a sudden I had to get used to a new one, become part of a new family, while trying not to disconnect from my roots.

Unfortunately, I don't have as many picutres as I would like to share, but I simply want to share and inspire on this lovely bleh  Monday!

First off, pick up some supplies if you don't have them lying around.  Obviously, those supplies need to reflect the theme/color scheme that you are going for.  I had previously picked up a wooden board, such as this:


other supplies: paint brushes, paint- mixture of spray paint, craft paint and laquer if you so choose, craft glue, hot glue gun, ribbon, string or hemp to hang it, glue-able artifacts, butons, etc...

Day 1: I braided some hemp together and attached it to the back as my hanger (let dry as you begin painting), but you could also attach any old picture fram hangers.  Then I painted the background color-it may need 2 or 3 coats, so just give them ample time in between to ensure maximum dry time.
Day2: I hot-glued the border on and began painting the lettering.  The border is simply some decorative wire mesh that I found, but the skies the limit on what you would like to use! 
I free-handed the lettering, but feel free to pick up some stencils to make your life easier.  I also did 2 coats on the lettering and then added gold accent after all that had dried.


Day 3:  If you decide to make it shiny with laquer, this would be the day (after everything is dry of course). I didn't, so on this day I hot glued little vintage metal decorations (hearts and stars) around the edges, so that I couldn't see where the mesh border was glued on the board and I think it tied it all together nicely!

Again, this is how it all turned out:
-and originally, I hung it on the interior door of our old apartment-


-but now it looks great on our living room wall!


(and no, our Christmas decor is not still up-these are just old pics lol)

Hopefully, I will remember to make another one soon! ;)
Happy Monday!

LinkWithin

Related Posts Plugin for WordPress, Blogger...